02. Selectors
Selectors Heading
CSS Selectors
ND001 C01 L02 02 Selectors
Tags
Tags
In this section, you'll learn how to use different visual CSS guidelines to style elements individually and by group.
CSS can select HTML elements by using an element’s tag name. A tag name is the word (or character) between HTML angle brackets.
For example, in HTML, the tag for a paragraph element is <p>. The CSS syntax for selecting <p> elements is:
p {
  color: red;
}
In the example above, all paragraph elements will be selected using a CSS selector. The selector in the example above is p. Note that the CSS selector matches the HTML tag for that element, but without the angle brackets.
In addition, two curly braces follow immediately after the selector (an opening and closing brace, respectively). Any CSS properties will go inside of the curly braces to style the selected elements.
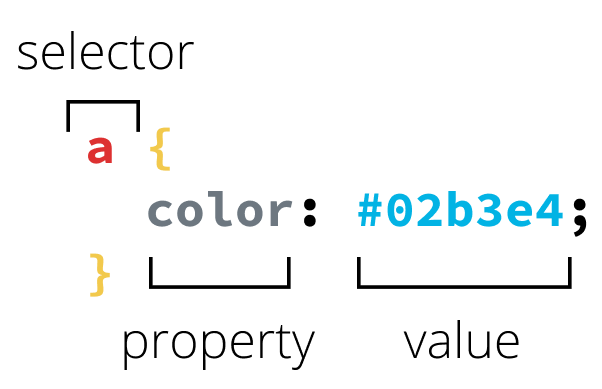
Tags Graphic

An example of a CSS selector, property and value.
Classes
Classes
CSS is not limited to selecting elements by tag name. HTML elements can have more than just a tag name; they can also have attributes. One common attribute is the class attribute. It’s also possible to select an element by its class attribute.
For example, consider the following HTML:
<p class="brand">Sole Shoe Company</p>The paragraph element in the example above has a class attribute within the <p> tag. The class attribute is set to "brand". To select this element using CSS, we could use the following CSS selector:
.brand {

}
To select an HTML element by its class using CSS, a period (.) must be prepended to the class’s name. In the above case, the class is “brand”, so the CSS selector for it is .brand.
Ids
Ids
For situations where you need more specificity in styling, you may also select elements for CSS using an id attribute. You can have different ids associated with a class (although a class is not required). For example, consider the following HTML:
<p id=”solo” class="brand">Sole Shoe Company</p>The id attribute can be added to an element, along with a class attribute. On the CSS side, the delineation is made by using # to represent an id, the same way . is used for class. The CSS to select and style the HTML element above could look like this:
#solo {
  color: purple;
}
Pseudo-classes
Pseudo-classes
A CSS pseudo-class is a keyword added to a selector that specifies a special state of the selected element(s). For example, :hover can be used to change a button's color when the user's pointer hovers over it.
selector:pseudo-class {
  property: value;
}
For more information on pseudo-classes, see the Mozilla Dev Docs here.
Quiz 1 - Pseudo-classes
SOLUTION:
#myButton:hover { }Attributes
Attributes
Attribute selectors are a special kind of selector that will match elements based on their attributes and attribute values.
Their generic syntax consists of square brackets ([]) containing an attribute name followed by an optional condition to match against the value of the attribute.
Attribute selectors can be divided into two categories depending on the way they match attribute values:
- Presence and value attribute selectors and
- Substring value attribute selectors.
These attribute selectors try to match an exact attribute value:
[attr]This selector will select all elements with the attribute attr, whatever its value.[attr=val]This selector will select all elements with the attribute attr, but only if its value is val.[attr~=val]This selector will select all elements with the attribute attr, but only if val is one of a space-separated list of words contained in attr's value. (This one is a bit more complex, so checking some documentation might be helpful.)
Quiz 2 - Attributes
SOLUTION:
`img[alt]`Multiple Selectors
Multiple Selectors
What if we want to add some styles to all our headings? We don’t want to have redundant rules, since that would eventually become a nightmare to maintain and is not scalable at all.
h1 {
  font-family: "Helvetica", "Arial", sans-serif;
}

h2 {
  font-family: "Helvetica", "Arial", sans-serif;
}

h3 {
  font-family: "Helvetica", "Arial", sans-serif;
}

h4 {
  font-family: "Helvetica", "Arial", sans-serif;
}

h5 {
  font-family: "Helvetica", "Arial", sans-serif;
}

h6 {
  font-family: "Helvetica", "Arial", sans-serif;
}
Instead, we can select multiple HTML elements in the same CSS rule by separating them with commas. Add this to our styles.css file:
h1,
h2,
h3,
h4,
h5,
h6 {
  font-family: "Helvetica", "Arial", sans-serif;
}
This defines the font to use for all of our headings with a single rule. That’s great, because if we ever want to change it, we only have to do so in one place. Copying and pasting code is usually a bad idea for web developers, and multiple selectors can help reduce that kind of behavior quite a bit.